
Jen Alberring and Alyssa Ellison of Sidney Elementary School shared this project as an ADST activity to complement a unit spent reading "Pax", a book about a fox by Sara Pennypacker. The project is a book stand for hands-free reading: the book's spine rests on the fox, and the open pages rest on the dowels (the book can also sit closed resting with the cover facing out). It's a great introduction to a range of tools including a drill press, electric hand drill, rasp, coping saw, back saw, speed square, screwdriver, etc. Note: depending on the skill level of the students, teachers may want to make a jig for drilling the dowel holes, which should be about 2" apart, and at least 1/2" in from the end and edges of the base plate. Thanks to Jen and Alyssa for sharing their photos and procedure!
Tools & Materials
Material List
- 1x4 pine, two pieces, one at 8", one at 5"
- 3/8" dowel, 4" per project
- scrap 1x4 for sawing guides, sanding blocks, etc.
- one #6 screw 1-1/4"
- wood glue
- non-toxic wax or oil finish
Tool list
- pencil
- sitting fox outline template (printed or drawn, max 4"x5")
- ruler
- speed square
- C-clamp and/or vise
- backsaw
- coping saw
- sand paper (80, 100, 120 grits)
- block plane or spoke shave
- rasp
- drill press
- electric hand drill
- drill bits: 5/64", 7/64", 5/16", 3/8"
- awl (or thin nail)
- screwdriver (matching #6 screw head)
- cloth rag
- optional: mitre box
- optional: hammer
- optional: steel wool to apply wax finish
Procedure
-
 Look at your smaller piece of wood (1"x4"x5") and notice the grain, knots, or special features. Decide which way you want to orient your fox. Lay your fox template onto your wood. Use a pencil to carefully trace around the fox contour.
 -
 Mark the project part of your wood with a check mark, and the scrap part of your wood with an "x" on each side. Measure and draw hash marks at about 1/2" apart all the way around your fox (see photo). Use a ruler to draw a straight line from each hash mark to the closest outer edge of the wood.
 -
 Draw a straight line using a ruler or speed square to mark off the excess wood above your fox's head and tail. Mark excess wood with an "x". (The photo shows this after the cut made in step 4).
 -
 Clamp your project between two pieces of scrap wood to the table. Make sure that the top piece of scrap wood is exactly on your cutting line, as in the photo. Cut along this line with the back saw using the top scrap wood as a guide.
 -
 Clamp your fox firmly to the edge of the table or into a vise, ensuring that the relief lines you want to cut are clear of the table. Cut along the relief lines towards your fox one at a time. Cut until you are just approaching the outline of the fox (about 1/16" away). Reposition your fox as often as necessary to cut all of the relief lines.
 -
 Secure your fox firmly with the clamp or in the vise, and begin to cut out the contour of the fox using a coping saw. Cut on the scrap side of the pencil line, at least 1/16" away from the line. Cut from one relief line to the next, and allow the chunks of wood to fall away from your project. Reposition your fox in the clamp or vise as often as necessary to cut all the way around the outside of the fox.
 -
 If you come to a spot that is too tricky to turn a corner with the coping saw, add another relief line (maybe on a diagonal). Cut along that first line and then proceed with cutting the contour.
 -
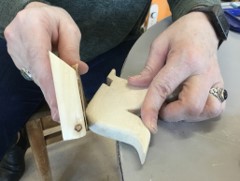
 Secure your fox in the vise or onto the table with the clamp, and begin to round the hard edges and shape the contours of your fox using a variety of rasps. Reposition and secure your fox as often as necessary to shape all the way around the fox. Flip and do the other side.
 -
 As you shape the corners and edges, don't forget to rasp the outer edge of the fox, removing any signs of relief cuts. Continue until all outer edges are rounded and becoming smooth.
 -
 Start with coarse 80 grit sandpaper (folded around a sanding block, if you choose). Hold your fox firmly and sand all sides of your fox until all rough edges and clamp/vise marks are removed. Switch to finer sandpaper (100 and 120) and continue until the fox is smooth.
 -
 Secure your larger piece of wood (1x4 at 8") in the vise, long edge facing up. Use the block planer or spoke shave to round the two long edges.
 -
 Flip your wood so you can round out the other side, as seen in the photo.
 -
 Secure your base in the vise or onto the table using the C-clamp so that the short ends are exposed. Use the rasp to round the two short sides, and smooth any other rough edges.
 -
 Sand your base until smooth (see step 10 for details).
 -
 Instructors: set up the drill press with the 3/8" bit so it drills a 1/2" deep hole. If needed, construct a simple jig to help students keep their hole spacing and position steady as they drill. Holes should be about 2" apart, and at least 1/2" in from the edges.
 -
 Students: tie long hair back and secure any loose clothing or jewelry. Put on safety eyewear. Use the drill press jig to drill your two dowel holes according to your teacher's instructions.
 -
Measure and mark the long centre on the bottom of your base. Put a check mark on the end of your wood FURTHEST from the holes drilled in step 16 to remind you that your fox will sit on this end, the opposite end to the dowels. Determine which way you want your fox to face, and place it on this line (remember, the fox will be glued to the TOP, you are just placing the fox here to figure out where to drill the hole in the bottom). Make sure the edge of the fox is sitting at least 1" in from the edge of the base.
-
 After you have your fox in the right position (see the finished project photos as an example), move the fox slightly to the side, and mark a dot on the centre line below the hind quarters of your fox; this will be where you drill the hole for the screw that secures the fox to the base.
 -
 Place your base onto a piece of scrap wood, then secure both firmly to the table using the C-clamp. Use the electric hand drill with a 7/64" bit to make a hole through the base at the pencil mark from the last step. Use the 5/16" bit and widen the top 1/16" of this hole to create a counter sink for your screw head.
 -
 Put an awl or nail up through the hole drilled in the last step. Position your fox on the base so its hind quarters are above the hole, then push gently to make a small indent in the bottom of your fox.
 -
Place your fox between two pieces of scrap wood (to protect it from vise marks), then secure it into the vise, bottom facing up. Use the electric hand drill with a 5/64" bit to drill a 1/2" deep pilot hole vertically into the bottom of the fox.
-
 Apply a small amount of glue to the bottom of the fox and the top of the base where the fox will sit. Hold your fox in place, and use the screw driver to screw your #6 x 1-1/4" screw up through the hole in the base and into the fox. Wipe up any excess glue with a damp rag. (You could also secure the fox upside down in the vise in this step, if holding both pieces of wood feels difficult).
 -
 Measure and mark 2" from the end of a 3/8" diameter dowel. Secure the dowel in the vise, to a piece of scrap wood, or in a 90 degree mitre box, and use the back saw to create a groove and then cut the dowel all the way through. Repeat this step so you have two 2" dowels.
 -
Use sandpaper to lightly sand the dowel ends smooth.
-
Roll the bottom 1/4" of one dowel in wood glue, and insert into one of the pre-drilled holes. Repeat for the second dowel. Gently tap the dowels to the bottom of the holes with a hammer if they are hard to seat using your hands. Wipe away any excess glue with a damp rag.
-
 Use a damp cloth to wipe away any sawdust from your project. Use a rag to apply oil finish (or steel wool to apply wax paste) to all surfaces of your fox and base, making sure to pay attention to the pegs, legs, and any small corners of your project.
 -
Allow your project to dry, then open your hardcover copy of "Pax" or whatever book you're reading. Place the spine of the book on the fox's nose (or tail), and the bottom of the pages against the dowels. Enjoy your hands-free reading! You can also place the book in the stand when it's closed, bottom resting on the dowels and the back cover on the fox.
Cutting out the fox
Shaping the fox
Prepare the base
Drilling the dowel holes
Attaching the fox to the base
Cut and insert the dowels
Finishing touches
Enjoy!
Extension Challenges
- Choose your own animal (or other simple outline) from your favourite book or story to create a custom book holder.
- Experiment with different technologies: can you cut your fox out with a CNC machine? Can you use a 3D printer to make your fox?
- Research different designs of book holders, such as cook book stands, and make your own version.
- Design a larger version of the book holder that could be used as a music stand to hold sheet music.
- Shape your fox out of a wider block of wood: glue two pieces of 5" 1x4 together or source a thicker plank to cut your fox outline from. Spend time shaping your fox with rasps, carving knives, or a rotary tool until it has the 3D shape of a real fox.