

The copper watering can is an advanced project designed for adult learners to be taught by someone experienced in soldering and brazing copper in a metal shop setting. Students will learn safe torch operation, preparation of metal surfaces, soldering and brazing techniques, bending copper tubing, and finishing techniques.
The project steps below are written for instructors who want to lead a group of people in making the copper watering can. Throughout the procedure you will find tips on how to introduce tools, demonstrate techniques, and help students troubleshoot common problems, all based on Andrea Durdle’s experience of developing and teaching this project to adult learners at Camosun College.
If you are not experienced at soldering and brazing copper pipe, consider inviting a plumber or boilermaker in to your class to help with safety and detailed instructions, such as how to inspect acetylene fittings, how to adjust the torch flames for optimal temperatures, etc.
Thanks again to Andrea for sharing her beautiful project!
Tools & Materials
Material List
- six+ ~6" lengths of 1/2" copper pipe
- four+ couplings for 1/2" copper pipe
- one 6" piece of 3" DWV copper pipe
- one 3" DWV copper test cap
- one 13" piece of 3/8" soft copper tubing
- one 9" piece of 5/8" soft copper tubing
- lead-free solder
- acid paste flux
- B-cup brazing rod
- sand cloth
- red Scotch pads, Brillo pads, or similar
Demonstration & practice materials
To make the watering can:
Optional:
Tool list
- large copper cutter (pipe cutter for 3" pipe)
- small copper cutter (pipe cutter for <1" tubing))
- safety glasses
- pencil reamers / deburring tools
- B tanks (acetylene) with turbo torches
- #14 tip for brazing
- #5 tip for soldering
- 3/8" tube benders
- 5/8" tube benders
- fitting brushes
- strikers
- wet rags
- water buckets
- tape measures
- permanent markers
- ball peen hammers
- combination squares
- water pump pliers
- half round double cut bastard files
- Tee drill and 1/2" bit
- portable band saw
- tubing straightener
- heat brick
To prepare the copper:
Class set of:
One each of:
Optional
Procedure
-
 B-tank must be tied to the table and stay upright, as acetone stabilizes the acetylene and can leak out if the tank is not upright.
 -
Acetylene smells pungent like garlic. You may smell some as you are lighting the torch, but it should dissipate. If the smell is constant or very strong, turn the torch off, close the tank, and inspect the tank and hose.
-
Turn the B bottle on 1/4 turn. Locate the gauge and regulator (brass knob). For soldering (lower temperature needed), turn the regulator open all the way, then back off two full 360 degree turns. For brazing, you will need a high heat; open the regulator all the way.
-
 Hold the torch in your non-dominant hand and locate the knob with your thumb. Hold the striker in your dominant hand. Use your thumb to turn the torch knob clockwise and start the acetylene flow. Flick the striker to make a spark at the tip of the torch to light it.
 -
Adjust the flow with your thumb to adjust flame intensity; more acetylene gives you higher heat. To extinguish the flame, turn the knob counterclockwise with your thumb.
-
Send students to their work station to practice this on repeat while you walk around and check that everyone can light, adjust, and extinguish their torch safely and confidently.
-
 Use sand cloth to clean the outside ends (the last ½”) of two 6” pieces of 1/2" pipe. Use the wire fitting brush to clean the inside of one connector sleeve fitting: poke the brush halfway in, twist clockwise about 180 degrees and pull out, then repeat. Clean until the copper is shiny, then don’t touch the surfaces with your bare hands, otherwise the oils can prevent a proper seal.
 -
Check that you have a #5 soldering tip on the torch, and that the regulator on your B tank is ready for soldering temperatures: two full 360 degree turns down from wide open.
-
 Apply a thin layer of acid paste flux to the ends of the pipes (the last ½”), and to the entire inside of the fitting. Add enough to make sure you cover all the surfaces but not so much that it’s hanging in globs. Push the prepared pipe ends into either side of the fitting. Wipe any excess flux away with a rag
 -
 Secure your copper in the vise, clamping the far end of one pipe to keep the fitting as far away from the vise as possible. This will help you heat the area you want to solder quickly, and not lose much heat to the vise.
 -
Unroll about 1’ of lead-free solder and put a 45° bend in the last 1”. Hold the spool in your dominant hand.
-
Put your safety glasses on. Light your torch and adjust your flame until you hear it whistle, holding the torch in your non-dominant hand.
-
 Heat your pipe and fitting from the bottom, waving your torch pointing up, about 1” away from the copper, and moving back and forth, overshooting the ends of the fitting sleeve by about 1” to heat the pipes up as well.
 -
 When you see the flux steaming, keep the torch waving back and forth, touch the tip of the solder to the seam on the far side of the pipe, and drag the solder wire across the top of the seam towards you, leaving melted solder in the seam. If done correctly, you will have used up about ½” of the solder wire. Check the bottom of the seam for drips, and quickly swipe them with the solid solder wire to remove them. Repeat for your second seam on the other end of the fitting.
 -
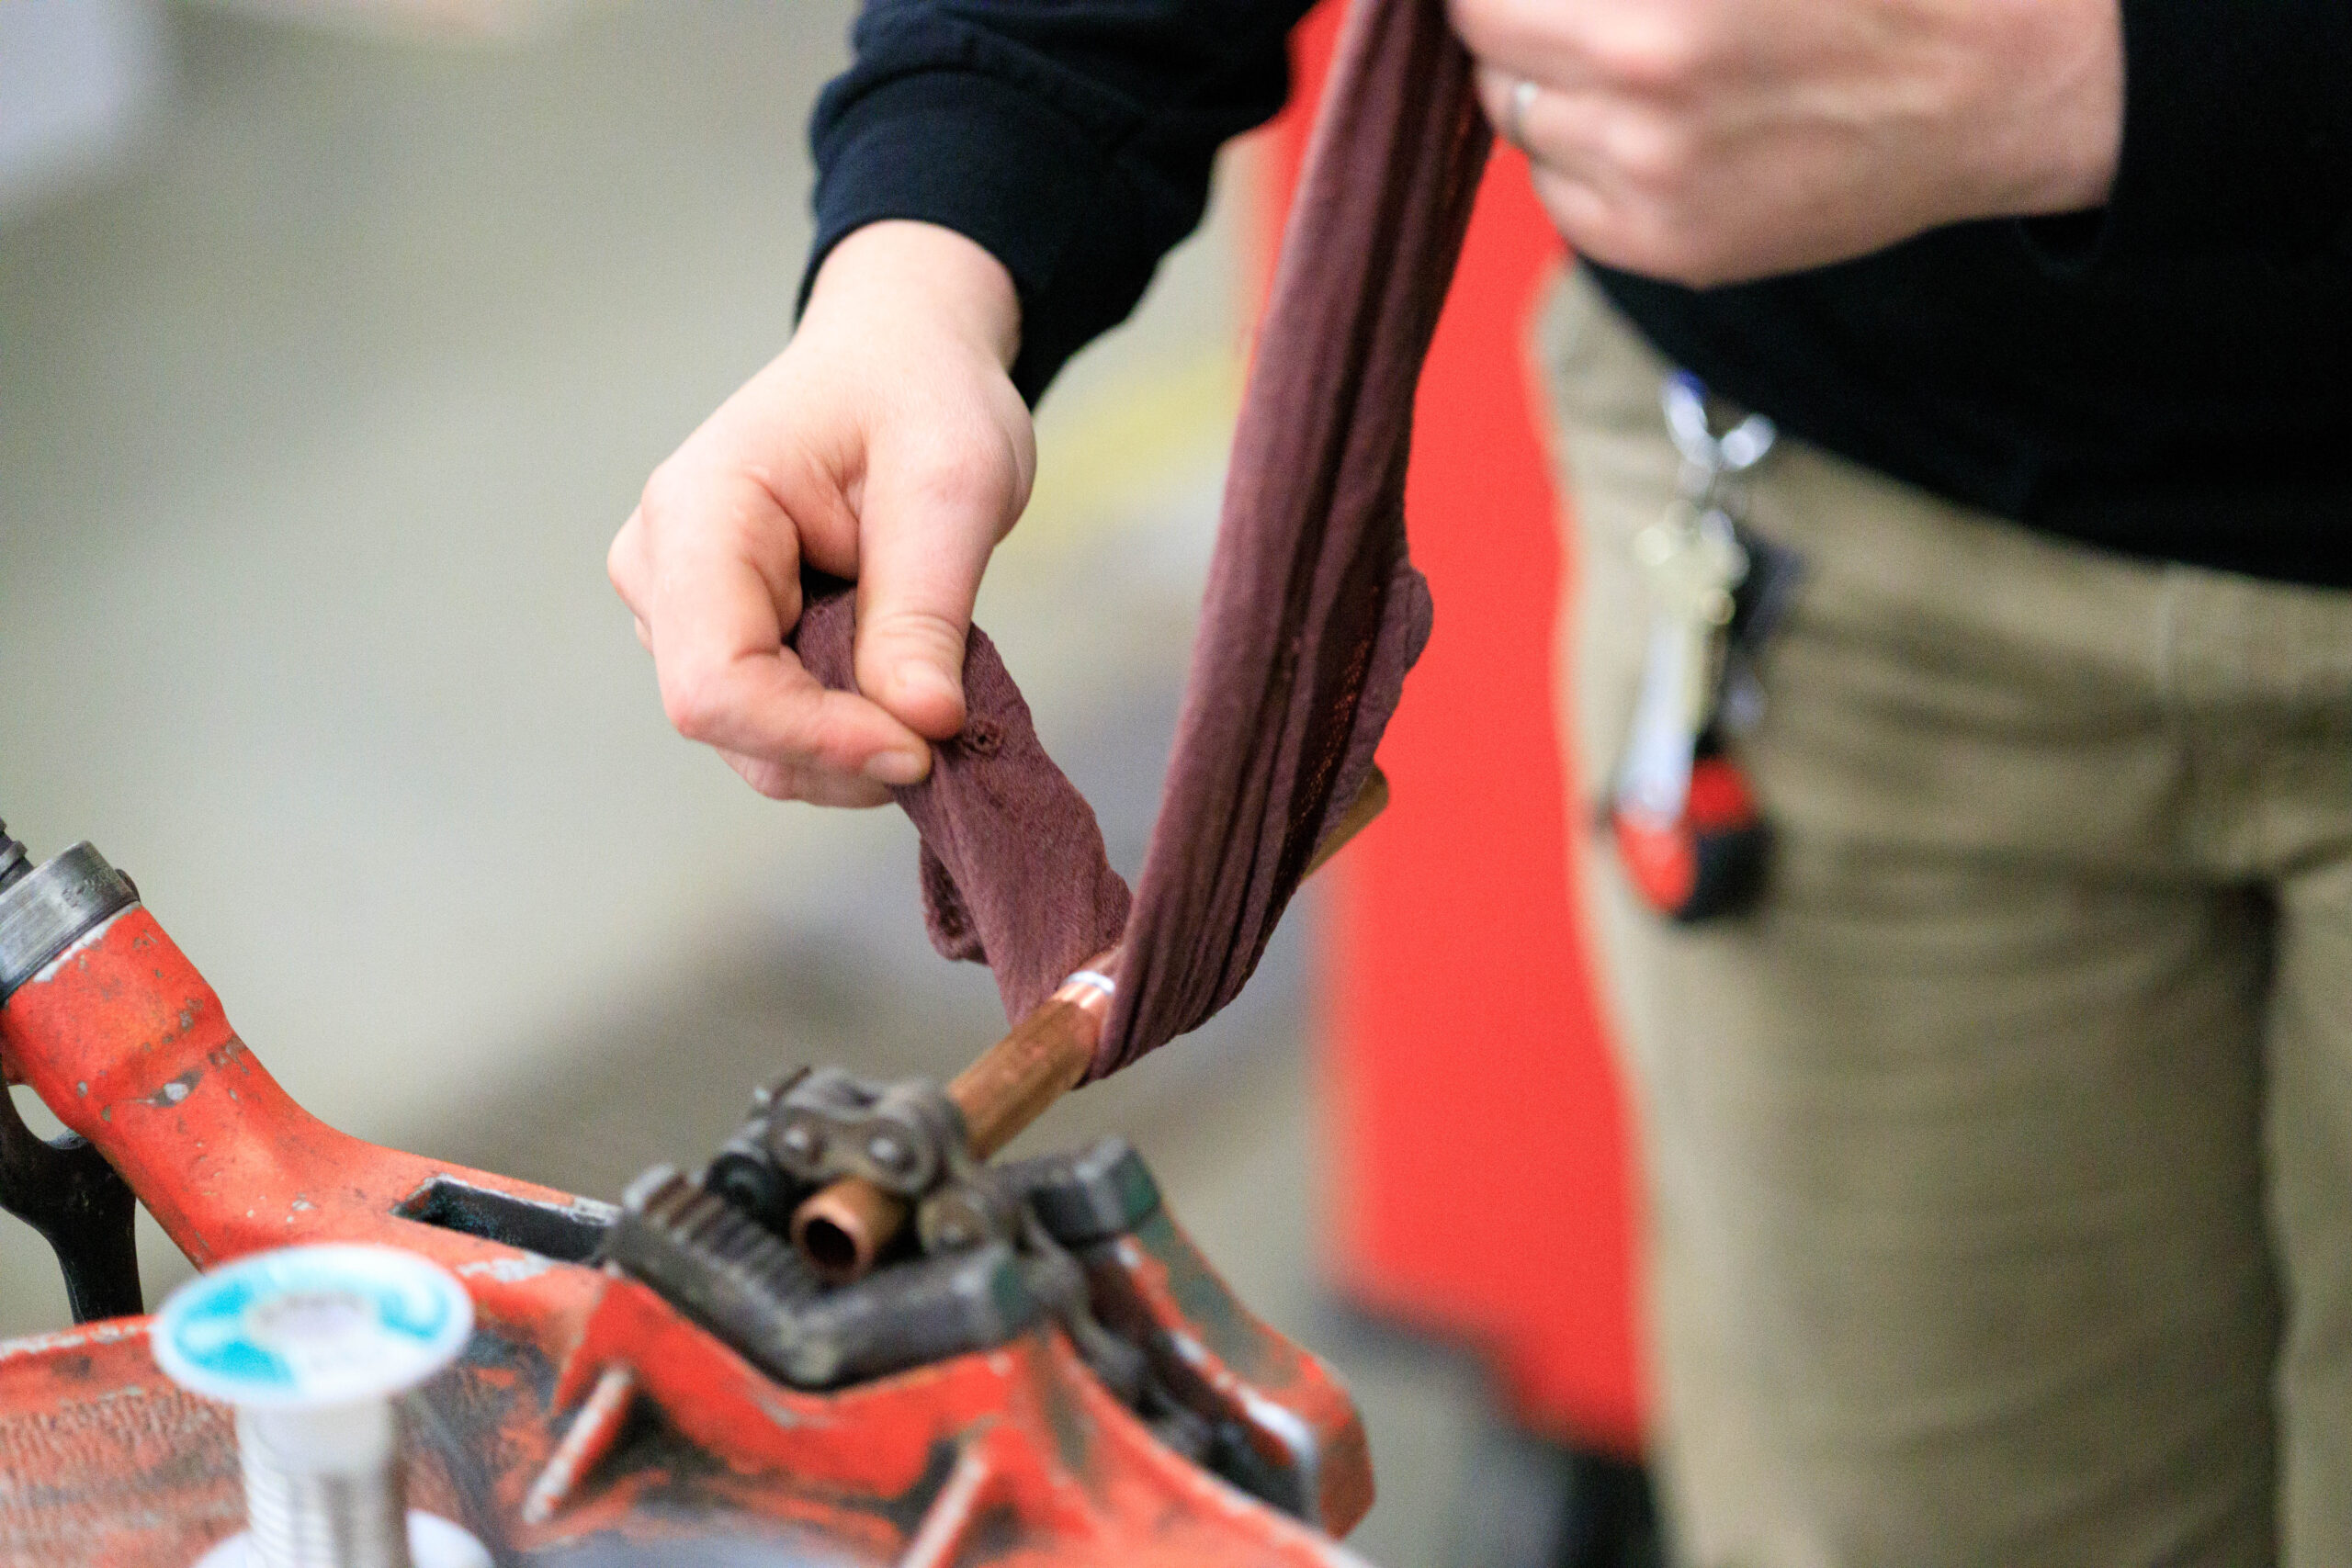 THE ENTIRE PIPE WILL BE VERY HOT: keep your bare hands away. Wipe your newly soldered joint with a wet cloth to remove any soot, and inspect your seam. You should be able to see the silvery solder in a continuous ring, joining the fitting to the pipe all the way around.
 -
Answer any questions students might have, then send them back to their work stations and circulate to observe and help. Encourage them to keep adding fittings and pipe lengths for more practice.
-
Clean two pieces of 6” ½” copper pipe and one coupling as you did in step 7 before soldering. B-cup brazing alloy does not require flux.
-
Fit the clean pipe ends into the coupling and secure the end of one pipe in the vise, keeping the coupling as far away from the vise as you can so it cannot “steal” the heat away from your brazing.
-
Change the tip on the torch to a #14 brazing tip, and turn the regulator on your B tank clockwise until it’s fully open. When you light it, it will be much louder than when you were soldering.
-
Put your safety glasses on. Light your torch and adjust your flame until you hear it screaming loud, holding the torch in your non-dominant hand, and the brazing rod in your dominant hand.
-
Hold the torch tip ¼” away from your copper fitting; begin by heating from underneath, waving your torch back and forth, then heat the sides and the top, until the whole fitting and pipe around it is glowing bright orange.
-
Keeping the torch and brazing rod very close together, run the brazing rod around the seam in a similar manner to your soldering technique. This time, heat the coupling to draw the melted brazing alloy into the seam, and add a bit more at a time until you see it fill the seam.
-
Turn your torch off and allow the pipe to cool. Take your wet rag and wipe the brazed pipe clean to inspect your seal.
-
Answer any questions students might have, then send them back to their work stations to prepare their copper pieces. Have them to check in with you when they are ready to light their torch so you can check their setup for: #14 tip, regulator open all the way. Encourage them to keep adding fittings and pipe lengths for more practice.
-
One 6” piece of 3” DWV copper, one 3” DWV copper test cap, one 13” piece of 3/8” soft copper tubing, one 9” piece of 5/8” soft copper tubing
-
When using the copper cutters (pipe cutters), place the cutter over the pipe, and tighten until the blades grab gently. Roll the pipe one time 360°, then tighten the cutter knob ¼ turn. Repeat the roll and tighten maneuvers until the pipe is cut through. Take it slowly: if you tighten any more than ¼ turn at a time, you might crush the pipe and deform it.
-
 Deburr sharp edges: ream the inside edges with the pencil reamer, and smooth any exterior snags using a file.
 -
 Use a tape measure and permanent marker to mark an “x” on one end of the pipe 1” up from the end. This will mark the spout hole.
 -
Secure the pipe in a chain vise and prepare the Tee drill. First, insert the ½” bit into the drill and ensure that the forming pins are retracted.
-
 Next, plug the drill in, and make sure it is in forward mode. Align the drill bit with the “x” on the pipe and apply even pressure, then pull the trigger and drill until the bit goes all the way into the pipe. Hold the drill steady here, do not pull the drill bit back out of the hole yet.
 -
 Turn the bit to extend the forming pins out from the head, then lock the bit guide into the retract position by pulling it out. Put the drill in reverse, then apply even pressure DOWNWARD again, pulling the trigger, and letting the drill do the work of coming upwards and forming the tee.
 -
Send students to their work stations to mark their 3” pipe, then let them come up one at a time to use the tee drill at your vise while you supervise.
-
 Run your 13” piece of 3/8” tubing through the tubing straightener if you have one. Explain to students that all the curves will be made along the same plane (the pipe should lay flat on a table without rocking). To achieve this, they should secure the mandrill arm in the vise so it is parallel with the floor, and always align their pipe in the bender carefully each time before locking the pipe in place and bending it. Have an example students can refer to: the first two bends go in one direction, and the third in the opposite direction.
 -
Use your tape measure and permanent marker to measure and mark a line 4 ½” from one end.
-
 Secure the mandrill arm of your 3/8” pipe benders in a vise, mandrill dial facing up so the arm swings parallel with the floor. Line up the 0 on the arm with the 0 on the mandrill. Slide the pipe into the bender so the short end (4 ½”) is poking out to the LEFT.
 -
 Align your mark at the “L” on the bender arm and hook the holding clamp over the pipe to secure. Pull the arm to bend the tube, stopping when the 0 on the arm lines up with the 90° mark on the mandrill.
 -
 Place the end of your tape measure in the centre of the short straight pipe section and mark another line at 4 ½” along the longer section of pipe from the turn as shown.
 -
 Open the bender so the 0 lines up with the 0. Place the pipe in the bender again, the bent part to the LEFT of the mandrill, the end running back towards you alongside the mandrill arm (you will be bending a “U” shape, not an “S” shape).
 -
 Align the second mark with the “L” on the bender arm. Twist the pipe so it is parallel with the floor/mandrill. Hook the holding clamp over the pipe. Pull the arm to bend the tube, stopping when the 0 on the arm lines up with the 135° mark on the mandrill.
 -
 Hook the measuring tape over the last bend and make a mark 2 ¼” along the straight end of the pipe as shown.
 -
 Line up the 0 on the mandrill with the 0 on the arm. Put your pipe in the bender, previous bend to the LEFT and curving up away clockwise from the mandrill arm. You will be making an “S” shape with this last bend, bringing the two pipe ends into parallel with each other.
 -
 Twist and align your pipe to keep all your curves on the same plane. Line your mark up with the “L” and hook the holding clamp over the pipe. Pull the arm to bend the pipe until the 0 on the arm lines up with the 45° mark on the mandrill.
 -
Make sure your pipe ends are equal: ie, when you place the ends on a table, that the top section of the handle is parallel to the table. Trim an end with the small copper cutter if you need to.
-
 Flatten the ends of the pipe handle so they will sit close to the inside of the watering can body. Measure and mark a line ¾” up from both ends of the tubing. Place one end in a vise up to the mark, making sure the curved plane is perpendicular to the vise jaws (see picture). Close the vise to crush the end flat. Repeat with the other end. Flatten the ends more by tapping them with a ball peen hammer if you need to.
 -
Send students back to their workstations to form their handles, circulating to answer questions. To prevent any mis-bends and conserve supplies, you can require that they call you over to check the positioning of their tubing before each bend.
-
Secure the end of the watering can body in the chain vise, the tee drill hole for the spout pointing straight up and closest to the vise.
-
Use the sanding cloth to polish and clean both sides of each flattened end of the handle, as well as the inside top of the 3” watering can body, making sure not to touch the cleaned areas with your fingers.
-
 Fit the flat handle ends into the top of the watering can opposite the hole, making sure the extended portion of the handle is pointing up and in line with the spout hole (see photo).
 -
 Use water pump pliers to crush the ends tightly to the watering can body. The handle should sit snugly in place on its own friction fit: if it’s too loose, remove it, bend the ends apart slightly, and slide it back in place.
 -
Prepare your equipment for brazing: Put a #14 brazing tip on your torch. Your bottle should remain ¼ turn open; open the regulator all the way. Light the torch, and hold the brazing rod in your dominant hand.
-
 Hold the tip of the torch ¼” above the flat piece of handle on the bottom inside of your watering can, heating the two pieces of copper until the whole area is glowing orange. Keeping the torch in place to keep the area hot, run the tip of the brazing rod around the seam where the flattened tubing meets the watering can body, and then run it once over the top of the flattened tube. You should see the brazing rod melt and fill in the seam, then melt across the flat part, creating a tidy, thin pool.
 -
 Let your can cool, then turn it upside down in the vise and repeat for the other side of the handle. Let it cool again, then wipe the areas clean with your wet rag.
 -
Send your students back to their work stations to install their handles. Tell them to call you over when they are ready to start brazing: make sure their handles and watering cans are in the correct orientation, then have them light and adjust their flame so you can confirm they’re ready to braze.
-
Run your 9” piece of 5/8” tubing through the tubing straightener if you have one. Explain to students that the spout will be curved into an “S” shape, and to again keep the curves in plane so it can lay flat on a table without rocking.
-
 Measure and mark a line 2 ½” from one end.
 -
 Secure the mandrill arm of your 5/8” pipe benders in a vise, mandrill dial facing up so the arm swings parallel with the floor. Line up the 0 on the arm with the 0 on the mandrill. Slide the pipe into the bender so the short end (2 ½”) is poking out to the RIGHT.
 -
 Align your mark at the “R” on the bender arm and hook the holding clamp over the pipe to secure. Pull the arm to bend the tube, stopping when the 0 on the arm lines up with the 75° mark on the mandrill.
 -
 Place the end of your measuring tape at the centre of the previous bend, and measure and mark the tubing at 4 ½”.
 -
 Open the tube benders so the 0 lines up with the 0. Place your tubing in the bender so the curved part is pointing to the LEFT. Align your mark with the “L”, twist the tube so the curved plane is parallel to the mandrill, then hook the holding clamp in place.
 -
 Pull the handle and bend until the 0 on the arm lines up with 125° on the mandrill.
 -
Send students to their work stations to make their spouts.
-
 Lay the spout flat on the work surface and use your combination square and pen to mark a spout line on the second curve, approximately 45° across the pipe as shown.
 -
 Secure your spout in a vise, keeping the spout on its side (in the same orientation as you marked the line), then use a portable band saw to make the spout cut directly downward on the mark. Bring the saw teeth close and line up your cut, then take the safety off, bring the blade up to speed, and gently let the saw cut through the pipe; you don’t need to push hard, just let the saw do the work).
 -
 Clean away any sharp edges with your file and sand cloth.
 -
Have students mark their spout cuts, then come up one at a time to make their cuts at your work station as you supervise them using the saw.
-
Clean the outside of the spout base with the sand cloth. Clean the inside of the tee spout hole on your watering can body with the fitting brush.
-
Secure your watering can in the vise with the tee spout hole facing UP and as far away from the vise/chain as possible.
-
 Fit the spout into the hole and pinch the tee edges around it with water pump pliers to ensure the spout stays in place. Make this a tight fit, as it can loosen when it’s heated, and you need it to stay in place while you’re working.
 -
Make sure your regulator is open all the way, then light and adjust your flame, and pick up your brazing rod in your dominant hand. Hold the tip of the torch ¼” away from the copper, angled at 45° to the 3” pipe, as you heat the base of the spout and the surrounding can until it is all glowing orange.
-
REMEMBER: if the spout starts to fall, LET IT. It will be very hot, and it might be tempting to push it back in place with your hand without thinking. If it falls, let everything cool and start again, pinching the spout in place with the pliers.
-
 Keep the torch heating the area as you touch the tip of your brazing rod to the seam. Run it quickly along the seam, applying the brazing sparingly, as any extra that melts on will have to be removed later with your file. Try not to get any brazing near the bottom of the 3” pipe, as it will need to be removed before you solder the base on.
 -
Grip your can with the water pump pliers, remove it from the vise, and dunk it in the water bucket to cool. Wipe it clean with the rag and inspect your seam.
-
Send students back to their work stations to do their brazing. Have them call you over when they are ready to start so you can check the snugness of their spouts and watch them light and adjust their flames.
-
Turn the regulator on your bottle down two full turns. Replace the brazing tip with the #5 soldering tip. Secure the can in the vise in the exact orientation as when you brazed the spout on.
-
Use sand cloth to clean the outer bottom rim of your watering can, and the inside rim of the 3” DWV test cap. Apply a thin layer of flux to the cleaned surfaces to be joined, then slide the cap onto the bottom of your watering can.
-
 Pull out 1’ of solder and bend the last 1” at 45°. Light your torch and adjust your flame. Hold the torch about 1 ½” from the copper and heat the seam, focusing on the bottom (instead of the top, as the heat will rise, and if you only focus heat on the top, the bottom of the seam might not get hot enough).
 -
 When you see the flux steaming, touch the end of the solder to the seam, starting at the top and running it down one side, letting gravity help it along, then repeat down the other side. Knock any drips off the bottom by swiping them away with your solder wire.
 -
Let your can cool, then wipes away excess flux with your rag and visually inspect your seam.
-
Fill the can up with water and sit it on the floor for a few minutes to see if any leaks appear.
-
 If you see a leak, make a note of where (if you can) see the water coming out. Set the can upright on a heat brick and torch the bottom seam, adding solder as needed.
 -
File away any solder or brazing drips as necessary.
-
Place the watering can on a flat surface to see if it sits flat. If it rocks at all, tap the centre of the bottom with a ball peen hammer until it sits stably on the table.
-
 If you like the aged look, your watering can is done! If you want to shine it up and make it bright and coppery, rub it with the scotch pad and/or emery cloth until you achieve your desired finish.
 -
Enjoy your new watering can!
Acetylene safety section. Explain the following to students:
Torch demonstration and assessment. Gather students and do a demo of the following steps:
Soldering demonstration and assessment. Gather students again and do a demo of the following steps:
Brazing demonstration and assessment. Gather students again and do a demo of the following steps:
Cut the copper pipe and tubing. Demo for students, or pre-cut lengths for them.
Make the handle. Gather your students and demonstrate the following steps:
Braze the handle on. Gather students to your work station and demonstrate the following steps:
Making the spout. Gather students around your workstation and demo the following steps:
Cutting the spout end. Gather students at your work station and demo the following steps:
Braze the spout on. Gather students at your work station and demonstrate the following steps:
Solder the bottom on. Gather students to your work station and demo the following steps:
Testing and tuning the can:
Extension Challenges
- Now that you know some basics on how to join copper, design your own project! Make sure to use lead-free solder, especially if you will be using your projects with food or for children.